
We are obsessed with these new felt cross stitch pillow kits from Rico Design! They come in adorable patterns and are quick and easy to stitch. (The spaceship kitten one here was completed in just a weekend!) Wouldn't they make an amazing gift?
The cross stitching is done with colorful wool on a pre-punched felt pillow cover, so it couldn't be easier. When you are done stitching, simply sew on the felt pillow back that is included with the kit, and then stuff. Instructions are included in the kit, but see below for our step-by-step.
Check out all the pillow designs in the Stitched Modern shop.

Materials
- Felt Cross Stitch Cushion Kit - Cat in Space
- Scissors
- (Optional) Needle threader
- (Optional) Wonder Clips or clothespins
- 14-inch pillow form
Step 1: Sort wool
Start by unpacking your kit and sorting out the various colors of wool. This will help you stay organized as you stitch.

Step 2: Thread your needle
The design is stitched using a full strand of wool. If you are having trouble threading the needle, a needle threader can help.
Step 2: Start in the bottom corner
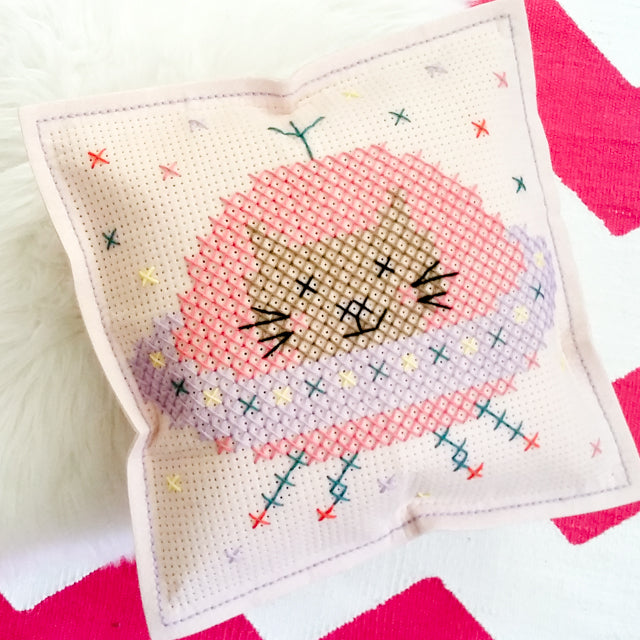
When starting a cross stitch project, it is typical to begin in the middle of the pattern, but because this design needs to be precisely centered on the pillow, the instructions in the kit suggest starting in the bottom right corner. On the Cat in Space pattern, the closest stitch is a single pink one, so that is where I started.

Step 3: Make big stitches
This pattern worked up especially fast because the design calls for extra large cross stitches made by skipping a row of holes with each stitch. It is similar to stitching over two threads on linen.

Note: Not all of the cushion designs are stitched over two. Some are stitched over one like you would normally do on Aida. The instructions that come with the kit will tell you what type of stitch to use.
The kit comes with a sharp chenille needle, so you will need to use care not to pierce the felt cushion or the wool. I found it easier to switch to a size 20 blunt-end tapestry needle, but either works.
As you stitch, it is important to count carefully to make sure you are stitching in the right spot. I worked out from the bottom right corner, stopping occasionally to check my position against the edges of pillow. When counting remember that you are working "over two" so two holes equals one stitch.
When moving to a new area of the design, end your thread and start a new one so you don't carry the thread across the back of the fabric. Unstitched thread on the back may show through the holes when the pillow is finished.
Step 4: Add backstitches
When you have completed all the cross stitches, add the backstitch detail. Back stitching is done at the end so that the stitches will lie on top of the cross stitches.

Step 5: Sewing the pillow
When you are done with all the cross stitching and backstitching, it is time to sew the pillow together. The kit comes with a matching felt back, and both the front and back pieces are pre-punched with holes, so sewing the pillow together is a simple matter.
Start by matching up the front and back pieces and sewing a running stitch around three sides. Work carefully to make sure you are using the pre-punched holes and not poking new holes through the felt. Once you reach the fourth side, insert a pillow form. I used a 14-inch pillow form, but if you want the pillow a bit plumper, you might be able to fit a 16-inch form.

Once the pillow form is inserted, it is a good idea to hold the front and back together with Wonder Clips or clothespins. This makes sewing the final edge much easier.

When you get back to where you started your stitches, turn the pillow around and start a running stitch in the other direction, filling in the gaps you left on your first pass.

That's it! All that's left is to fluff and enjoy. This is a super-simple project that is perfect for beginners. I loved stitching it and can't wait to do another!

Here are some other pillow kits available in the shop. So cute. Check them out here!